Thursday, 25 May 2017

Post the Purchase Journal in ax 2009

class       PurchJournalChangeType
extends     RunBaseBatch
{
    PurchaseType        purchaseType;
    QueryRun            journal;
    Query               query;

    DialogField         fieldContinue;
    PurchTable          purchTable;


    #define.CurrentVersion(1)
    #LOCALMACRO.ParmList
        PurchaseType
    #ENDMACRO
}


public boolean canGoBatchJournal()
{
    return true;
}

Object dialog()
{
    FormRun formRun = classfactory.createQueryForm(this);
    ;

    formRun.init();
    return formRun;
}

void new(PurchaseType  _purchaseType)
{
    QueryBuildDataSource    queryData;
    QueryBuildRange         queryRange;
    ;

    super();

    this.getLast();

    purchaseType = _purchaseType;

    query = new Query();

    query.addDataSource(tablenum(PurchTable));
    queryData   = query.dataSourceTable(tablenum(PurchTable));
    queryRange  = queryData.addRange(fieldnum(PurchTable, PurchaseType));
    queryRange.value(queryValue(PurchaseType::Journal));
    queryRange.status(1);  // locked

    queryData.addRange(fieldnum(PurchTable, PurchId));
    queryData.addRange(fieldnum(PurchTable, CreatedDateTime));

    journal = new QueryRun(query);
}

container pack()
{
    return [#CurrentVersion,#ParmList,journal.pack()];
}

public QueryRun queryRun()
{
    return journal;
}

void  run()
{
    #OCCRetryCount
    ;
    journal.query().dataSourceTable(tablenum(PurchTable)).update(true);
    journal.query().dataSourceTable(tablenum(PurchTable)).concurrencyModel(ConcurrencyModel::Optimistic);

    while (journal.next())
    {
        purchTable = journal.get(tablenum(PurchTable));

        setprefix(#PreFixField(PurchTable, PurchId));
        try
        {
            ttsbegin;

            purchTable.PurchaseType = purchaseType;

            if (!purchTable.validateWrite())
            {
                throw Exception::Error;
            }

            purchTable.write();
            ttscommit;
        }

        catch (Exception::Deadlock)
        {
            purchTable = PurchTable::find(purchTable.PurchId, true, ConcurrencyModel::Optimistic);
            retry;
        }

        catch (Exception::UpdateConflict)
        {
            if (appl.ttsLevel() == 0)
            {
                if (xSession::currentRetryCount() >= #RetryNum)
                {
                    throw Exception::UpdateConflictNotRecovered;
                }
                else
                {
                    purchTable = PurchTable::find(purchTable.PurchId, true, ConcurrencyModel::Optimistic);
                    retry;
                }
            }
            else
            {
                throw Exception::UpdateConflict;
            }
        }

        catch (Exception::Error)
        {
            checkFailed("@SYS25904");
        }
    }
}

public boolean runsImpersonated()
{
    return true;
}

boolean unpack(container packedClass)
{
    Integer         _version      = conpeek(packedClass,1);
    container       _packedQuery;

    switch (_version)
    {
        case #CurrentVersion:
            [_version,#ParmList,_packedQuery] = packedClass;
            if (_packedQuery)
                journal = new QueryRun(_packedQuery);
            break;

        default:
            return false;
    }

    return true;
}

static PurchJournalChangeType  construct(PurchaseType  purchaseType)
{
    return new PurchJournalChangeType(purchaseType);
}

static ClassDescription description()
{
    return "@SYS6146";
}

static void  main(Args  args)
{
    PurchJournalChangeType  purchJournalChangeType;
    ;

    if (!args)
        throw error("@SYS25407");

    purchJournalChangeType = PurchJournalChangeType::construct(args.parmEnum());

    if (purchJournalChangeType.prompt())
        purchJournalChangeType.run();
}


Wednesday, 17 May 2017

LoadStandardCost through X++ in ax 2009

static void FS_Load_Standard_Cost_DB(Args _args)
{

//scapistrant-20100903
//Mods 2010-12-29 per DBucher

    inventitempricesim          inventitempricesim;

    FileName                    fileName;
    SysExcelApplication         excelApp;

    boolean                         rowFound = true;
    boolean                         TrueFalse = true;

    counter                         readCounter   = 0;
    counter                         ErrCounter    = 0;
    counter                         InsertCounter = 0;
    counter                         updateCounter = 0;

    Itemid                          fsName;

    int                             lineNum = 4;
    int                             lineNumEnd = 999999;

    Dialog                          dialog;
    DialogField                     dialogFieldFileName;
    DialogField                     dialogFieldStartLineNum;
    DialogField                     dialogFieldEndLineNum;
    DialogField                     dialogFieldInventDimId;


    SysOperationProgress            progress = new SysOperationProgress();
    #AviFiles

;

    progress.setAnimation(#AviUpdate);
    progress.setCaption("Load Standard Cost into InventItemPriceSim");

     dialog              = new Dialog('Load Standard Price into InventItemPriceSim table');
    dialogFieldFileName = dialog.addField(typeId(FileNameOpen), 'File name', 'Filename containing input data');
    dialogFieldFileName.lookupButton(2);
    dialogFieldStartLineNum = dialog.addField(typeid(Integer),"Starting Liine Number","start loading records at line number specified");
    dialogFieldStartLineNum.value(lineNum);
    dialogFieldEndLineNum = dialog.addField(typeid(Integer),"Ending Liine Number","stop loading records at line number specified");
    dialogFieldEndLineNum.value(lineNumEnd);
    dialogFieldInventDimId = dialog.addField(typeid(inventDimId),"Enter InventDimId relating to InventDimTable filtered by Site ID for AE");


    if (dialog.run())
    {
        fileName = dialogFieldFileName.value();
        if(!fileName)
        {
            info(strfmt('No file name specified'));
            return;
        }

        if (dialogFieldStartLineNum.value() > 0)
        {
            lineNum = dialogFieldStartLineNum.value();
        }

        if (dialogFieldEndLineNum.value() > 0)
        {
            lineNumEnd = dialogFieldEndLineNum.value();
        }


        ExcelApp = SysExcelApplication::construct();
        ExcelApp.workbooks().open(filename);
        try
        {
          while (rowFound && ExcelApp.activeSheet().cells().range(strfmt('A%1',lineNum)).item(lineNum))
          {
            readCounter++;


            if (lineNum > lineNumEnd)
            {
                rowfound = false;
                continue;
            }

            if (ExcelApp.activeSheet().cells().item(lineNum, 1).value().variantType() == ComVariantType::VT_EMPTY &&
                ExcelApp.activeSheet().cells().item(lineNum, 2).value().variantType() == ComVariantType::VT_EMPTY)
            {
                 rowfound = false;
                 continue;
            }

            //load data
            ttsbegin;
            //values provided by Jeffery

            //inventItemPriceSim.ItemId = ExcelApp.activeSheet().cells().item(lineNum, 1).value().bstr();
            if (ExcelApp.activeSheet().cells().item(lineNum, 1).value().varianttype() == comVariantType::VT_R8)
                {
                    inventItemPriceSim.ItemId    = num2str(ExcelApp.activeSheet().cells().item(lineNum, 1).value().double(),0,0,2,0);//item ID-verify both
                }
                else
                {
                    inventItemPriceSim.ItemId    = ExcelApp.activeSheet().cells().item(lineNum, 1).value().bstr(); //item ID-verify both
                }
            info(ExcelApp.activeSheet().cells().item(lineNum, 1).value().bstr());
            info(num2str(ExcelApp.activeSheet().cells().item(lineNum, 1).value().double(),0,0,2,0));
            inventItemPriceSim.VersionId = "Std-2011fe";  //verify from accounting
            inventItemPriceSim.FromDate = str2date("01-31-2011",213);  // verify with acconting
            inventItemPriceSim.PriceType = CostingVersionPriceType::Cost;  // never change
            inventItemPriceSim.Price =  ExcelApp.activeSheet().cells().item(lineNum, 3).value().double();  //unit price
            inventItemPriceSim.PriceUnit = 1;  // always a 1
            inventItemPriceSim.UnitID = ExcelApp.activeSheet().cells().item(lineNum, 2).value().bstr();  //unit of measure
            inventItemPriceSim.InventDimId =  dialogFieldInventDimId.value();  //never changes
            inventItemPriceSim.insert();
            ttscommit;
            InsertCounter ++;
            lineNum ++;

          }
        }

        catch
        {
            excelapp.workbooks().close();
            excelapp.quit();
            info(strfmt('Error occured at rcd %1 for Item: %2', lineNum, fsName));
        }

    info("Records Read " + int2str(readCounter));
    info("Records Inserted " + int2str(insertCounter));

    }
    return;
}

Friday, 17 February 2017

Get started developing in AX 7


This blog will show how you can start making a customization in AX 7 by showing you the steps needed to make a simple script
Before starting customizing AX it is recommended to create your own Model
  • The first step is to log into Visual Studio as an Adminstrator
Dev1
Once within Visual Studio, go to the AX7 menu and select Model Management and ‘Create model’. A model is not exactly the same as a layer, but it might be a useful analogy to think of it as being similar to a layer in the sense, it is a way to isolate and manage your customizations
Dev2
Create the model in the form that appears and fill out the fields as appropriate

Dev3
Click ‘Next’ and select ‘Existing package’ and choose ‘Application Suite’

Dev4
Press ‘Next’ – accept the default values suggested and press ‘Finish’


Dev5
In the ‘Save’ screen that appears, select the project DynamicsAX7 and give it a name of your choice and press ‘OK’
Dev6
Notice in the Solution Explorer to the right in the screen a new Project has been created in your newly created Model

Dev7
On the Solution Explorer go to the project and rightclick and select ‘Properties’
Dev8
In here note that the project is in the new Model just created and that the customizations will be saved in the ‘USR’ layer
Dev9
Also, it’s a good idea to specify which company you wish to execute the code in, here ‘DEMF’
Press OK
 Now to add ‘Runnable Class(Job) to the Project do the following. On the project rightclick and select ‘Add’ and then select ‘New Item’
Dev10

In the screen shat appears select ‘Code’ and then ‘Runable Class(Job)’
Dev11
And press ‘Add’
Note that now in the Solution explorer that the Runable Class has been added
Dev12
Doubleclick on the ‘Runable class’ and enter the code editor window and give your job a meaningful name and write your code like you would do any X++ job as known in previous versions
dev12B
Save the project(Ctrl + S) and to compile the job, select ‘Build’ and ‘Build Solution’ from the toolbar
Dev13b

Wait until the output window reports that the build has completed
Dev14


Now in order to run the job, you need to set it as a ‘Startup Object’
Go to the Solution Explorer and on the Job, righclick and select ‘set as Startup Object’
Dev15
Now to execute the job, select ‘Debug’ in the toolbar and then ‘Start without Debugging’
Dev16
And note the output in the browser
DevFinalOutput

https://blogs.msdn.microsoft.com/axsupport/2016/03/23/get-started-developing-in-ax-7/
And that’s it. Happy AX7 developing !

http://www.slideshare.net/BohdanBilous/ax7-ide-part-i

http://www.slideshare.net/BohdanBilous/ax7-ide-part-i

Microsoft Dynamics® AX 7 Development Basics

Before we talk AX7 Development, we need to have look at few terminologies, which are as under

Element: Element is any Object residing in AOT. E.g. any Base Enumeration, any EDT, any Table, any Form, which you see in AOT Tree, is an element itself.

Model: A Model is a group of elements. A model is collection of elements that represent a distributable software solution.

Packages: A package is deployable unit, which may have multiple Models.

Project: Projects are the logical containers for everything that's needed to build your application. A project can be associated with only one model.

After we know basic terminologies, which will be used very frequently, let’s start with ways of developments AX7 provides.

With arrival of AX7, now we can do development in AX, with two methodologies.

  1. OverLayring
    If you have been developer of previous versions of AX such as AX2012 or AX2009, you don’t need explanation of this way of development. Name of this methodology ‘OverLayring’ is self-explanatory.
    In Microsoft Dynamics AX, a layer system is used to manage elements. The USR layer is the top layer and the SYS layer is the bottom layer, and each layer has a corresponding patch layer above it.
    OverLayring means if you do change/customize any element in upper layer, it will override its definition, in lower layer.
    This is what we were doing till AX2012 to customize AX. It basically allows customization of metadata and source code in higher layer. For example, you can add a new field in CustTrans Table in the user layer or in ISV Layer.
  2. Extension
    It refers to concept of extending existing elements, without overriding those into other layers. That means, elements will not be customized, instead elements will be extended. This approach reduces upgrade cost and conflicts. By creating extension elements, all of the customizations and code are stored in a separate assembly. It only contains the code that was added or changed in the extension file. Since this code resides in a separate assembly, it improves performance and the ability to upgrade and test.

Tuesday, 31 January 2017

Item Default Site order setting through X++ code in ax 2009

Before that we need one Excel work book in that first column need to fill the Item numbers.
then use this job.

static void Item_Default_Site(Args _args)
{
        SysExcelApplication             application;
        SysExcelWorkbooks               workbooks;
        SysExcelWorkbook                workbook;
        SysExcelWorksheets              worksheets;
        SysExcelWorksheet               worksheet;
        SysExcelCells                   cells;
        COMVariantType                  type;
        System.DateTime                 ShlefDate;
        FilenameOpen                    filename;
        dialogField                     dialogFilename;
        Dialog                          dialog;
        //Table Declarations Starts
        DlvMode                        dlvMode;
        str ItemNum;
        InventTable             inventTable;
        InventItemInventSetup   inventItemInventSetup;
        InventItemPurchSetup    inventItemPurchSetup;
        InventItemSalesSetup    inventItemSalesSetup;
        InventDim               inventDim;

        //Table Declartions Ends
        int                             row;
        #Excel
        // convert into str from excel cell value
    str COMVariant2Str(COMVariant _cv, int _decimals = 0, int _characters = 0, int _separator1 = 0, int _separator2 = 0)
        {
        switch (_cv.variantType())
        {
        case (COMVariantType::VT_BSTR):
        return _cv.bStr();
        case (COMVariantType::VT_R4):
        return num2str(_cv.float(),_characters,_decimals,_separator1,_separator2);
        case (COMVariantType::VT_R8):
        return num2str(_cv.double(),_characters,_decimals,_separator1,_separator2);
        case (COMVariantType::VT_DECIMAL):
        return num2str(_cv.decimal(),_characters,_decimals,_separator1,_separator2);
        case (COMVariantType::VT_DATE):
        return date2str(_cv.date(),123,2,1,2,1,4);
        case (COMVariantType::VT_EMPTY):
        return "";
        default:
        throw error(strfmt("@SYS26908", _cv.variantType()));
        }
        return "";
        }
        ;
        dialog              =   new Dialog("Excel Upoad");
        dialogFilename      =   dialog.addField(typeId(FilenameOpen));
       // dialog.filenameLookupFilter(["@SYS28576″,#XLSX,"@SYS28576",#XLS]);
        dialog.filenameLookupTitle("Upload from Excel");
        dialog.caption("Excel Upload");
        dialogFilename.value(filename);
        if(!dialog.run())
        return;
        filename            =   dialogFilename.value();
        application         =   SysExcelApplication::construct();
        workbooks           =   application.workbooks();
        try
        {
        workbooks.open(filename);
        }
        catch (Exception::Error)
        {
        throw error("File cannot be opened.");
        }
        workbook            =   workbooks.item(1);
        worksheets          =   workbook.worksheets();
        worksheet           =   worksheets.itemFromNum(1);
        cells               =   worksheet.cells();
        try
        {
        ttsbegin;
        do
        {
        row++;
        itemNum =(COMVariant2Str(cells.item(row,1).value()));
        #define.itemId(itemNum)
       // inventTable.ItemId = COMVariant2Str(cells.item(row,1).value());
          inventTable = InventTable::find(#itemId);
     #define.siteId('XXX')
       if(row > 1)
        {
        //Insert into InventSize Table
         if(inventTable.ItemId)
          {
             ttsBegin;

        inventDim.initValue();
        inventDim.InventSiteId = #siteId;
        inventDim = InventDim::findOrCreate(inventDim);

        //InventItemSalesSetup
        inventItemSalesSetup.clear();
        inventItemSalesSetup.initValue();
        inventItemSalesSetup.ItemId = inventTable.ItemId;
        inventItemSalesSetup.InventDimId = InventDim::inventDimIdBlank();
        inventItemSalesSetup.InventDimIdDefault = inventDim.inventDimId;
        inventItemSalesSetup.insert();

        //InventItemInventSetup
        inventItemInventSetup.clear();
        inventItemInventSetup.initValue();
        inventItemInventSetup.ItemId = inventTable.ItemId;
        inventItemInventSetup.InventDimId = InventDim::inventDimIdBlank();
        inventItemInventSetup.InventDimIdDefault = inventDim.inventDimId;
        inventItemInventSetup.insert();

        //InventItemPurchSetup
        inventItemPurchSetup.clear();
        inventItemPurchSetup.initValue();
        inventItemPurchSetup.ItemId = inventTable.ItemId;
        inventItemPurchSetup.InventDimId = InventDim::inventDimIdBlank();
        inventItemPurchSetup.InventDimIdDefault = inventDim.inventDimId;
//        inventItemPurchSetup.inventSiteId()
        inventItemPurchSetup.insert();
        ttscommit;
        }

         info(strfmt(" uploaded successfully"));
        }
        type = cells.item(row+1, 1).value().variantType();
        }while (type != COMVariantType::VT_EMPTY);
        application.quit();
        ttscommit;
        }
        catch
        {
        Error("Upload Failed");
}
}

Wednesday, 19 October 2016

import-customer-mastervendor-master-and-their-primary-addresses on Ax 2009

https://shekhardiptiman.wordpress.com/2010/01/14/dynamics-ax-2009-%E2%80%93-import-customer-mastervendor-master-and-their-primary-addresses/

Friday, 30 September 2016

passing parameters between forms in AX

https://calebmsdax.wordpress.com/2013/02/22/passing-parameters-between-forms-in-ax/

Tuesday, 27 September 2016

Copy user groups from one user to another X++ in ax


//Copy user groups from one user to another X++
static void KR_AXEcopyUserGroup(Args _args)
{
    usergrouplist usergrouplist,ins;
    userid src,dest;
    dialogfield srcdf,destdf;
    dialog dialog;
    ;
    dialog = new dialog("copying user's user groups");
    srcdf = dialog.addField(typeid(userid),"Source");
    destdf = dialog.addField(typeid(userid),"Destination");


    if(dialog.run())
    {
        src = srcdf.value();
        dest = destdf.value();
        if(src!="" && dest !="")
        {
            ttsbegin;
            while select * from usergrouplist
            where usergrouplist.userId == dest
            {
                info(strfmt("Before update: '%1'-'%2'",usergrouplist.userid,usergrouplist.groupId));
            }

            info("Deleting user groups from destination user");
            delete_from usergrouplist
                where  usergrouplist.userId == dest;


            info("Copying user groups to destination user");
            while select * from usergrouplist
            where usergrouplist.userId == src
            {
                info(strfmt("source user: '%1'-'%2'",usergrouplist.userid,usergrouplist.groupId));
                ins.clear();
                ins.data(usergrouplist);
                ins.UserId = dest;
                ins.insert();
            }
            ttscommit;
            info("User groups has been copied!");
        }
    }
    else
    {
        info("Canceled by user");
    }


}

Sunday, 11 September 2016

Thursday, 18 August 2016

Import Excel Data into Dynamics AX 2009

https://vasanthax.wordpress.com/2010/08/19/import-excel-data-into-dynamics-ax-2009/

Success One:: Class:
Class Declaraion:
public class KR_CustPaymentImport extends objectRun

{
}
//////////////////////////////////////////////////////////////////////////
2: Run: 
void run()
{
     LedgerJournalTable ledgerJournaltable;
    LedgerjournalTrans ledgerjournalTrans;
    LedgerJournalName   ledgerJournalName;
   NumberSeq           numberSeq;
    COMVariantType     type,typeLoc;
    LedgerJournalACType ledgerJournalACType;
    Dialog  dialog;
    DialogField             dialogField;
    Filename                filename;
   // NumberSeq               numSeq;
    str                     jourName;

     int                 lineNum;
    COMVariant  COMVariant1;
    SysExcelApplication app;
    SysExcelWorkbooks   Workbooks;
    SysExcelWorkbook    Workbook;
    SysExcelWorksheets  Worksheets;
    SysExcelWorksheet   Worksheet;
    SysExcelCells       Cells;
    SysExcelCell        RCell;
    int                 row;
    int temp;
     #Excel

    str COMVariant2Str(COMVariant _cv,
                       int _decimals = 0,
                       int _characters = 0,
                       int _separator1 = 0,
                       int _separator2 = 0)
    {
        switch(_cv.variantType())
        {
            case (COMVariantType::VT_BSTR):
                return _cv.bStr();

            case (COMVariantType::VT_R4):
                return num2str(_cv.float(),
                                _characters,
                                _decimals,
                                _separator1,
                                _separator2);

            case (COMVariantType::VT_R8):
                return num2str(_cv.double(),
                                _characters,
                                _decimals,
                                _separator1,
                                _separator2);

            case (COMVariantType::VT_DECIMAL):
                return num2str(_cv.decimal(),
                                _characters,
                                _decimals,
                                _separator1,
                                _separator2);

            case (COMVariantType::VT_DATE):
                return date2str(_cv.date(),
                                123,
                                2,
                                1,
                                2,
                                1,
                                4);

            case (COMVariantType::VT_EMPTY):
                return "";

            default:
                throw error(strfmt("@SYS26908",
                                    _cv.variantType()));

        }
        return "";
    }
    ;
    dialog = new Dialog("Import Customer Payment Journal.");
    dialogfield = dialog.addField(typeid(Filenameopen), "Select File");
    dialog.run();
    if (dialog.run())
        {
            filename = (dialogfield.value());
        }
    app = SysExcelApplication::construct();
    app.visible(false);
    Workbooks = app.Workbooks();
    Workbooks.open(filename,0);
    Workbook = Workbooks.item(1);
    Worksheets = Workbook.worksheets();
    Worksheet = Worksheets.itemFromNum(1);
    Cells = Worksheet.Cells();
    row = 2;
    RCell = Cells.Item(row, 1);
 select firstonly ledgerjournalName where ledgerJournalName.JournalName == 'ARPay';
    ledgerJournalTable.JournalName = LedgerJournalName.JournalName;
    ledgerJournalTable.initFromLedgerJournalName();
    ledgerJournalTable.insert();
    numberSeq = NumberSeq::newGetVoucherFromCode(ledgerJournalName.VoucherSeries);
    // numberSeq = NumberSeq::newGetVoucherFromCode(ledgerJournalName.VoucherSeries);
     ttsbegin;
   // while(RCell.Value().double() > 0)
     do
    {

        ledgerJournalTrans.clear();
        ledgerJournalTrans.voucher = numberSeq.voucher();
        ledgerJournalTrans.LineNum = lineNum;
        ledgerJournalTrans.AccountType = LedgerJournalACType::Cust;
        //ledgerjournalTable.JournalNum =(Cells.Item(row, 1).value().bStr());
        ledgerJournalTrans.JournalNum = ledgerJournalTable.JournalNum;
        ledgerJournalTrans.initValue();
        ledgerjournalTrans.Company= curext();
        ledgerjournalTrans.TransDate =(Cells.Item(row, 1).value().date()); //any2date(Cells.Item(row, 1).value());//
        ledgerJournalTrans.AccountNum =COMVariant2Str(Cells.Item(row, 2).value());
        ledgerjournalTrans.MarkedInvoice = Cells.Item(row, 3).value().bStr();
        ledgerjournalTrans.Txt =Cells.Item(row, 4).value().bStr();
        ledgerjournalTrans.AmountCurDebit = (Cells.Item(row, 5).value().double());
        ledgerjournalTrans.AmountCurCredit =(Cells.Item(row, 6).value().double());
        ledgerJournalTrans.OffsetAccountType = str2enum(LedgerJournalACType,cells.item(row, 7).value().bStr());//cells.item(row, 7).value().variantType(); //LedgerJournalACType::Bank;//  LedgerJournalACType::Bank;
        ledgerJournalTrans.OffsetAccount =Cells.Item(row, 8).value().bStr();//'PNCUS'; //ledgerJournalTrans.findOffsetAccount();
        ledgerJournalTrans.PaymMode =Cells.Item(row, 9).value().bStr();
        ledgerjournalTrans.CurrencyCode =Cells.Item(row, 10).value().bStr();
        ledgerjournalTrans.PaymReference=Cells.Item(row, 11).value().bStr();
        ledgerjournalTrans.krDeductionType=Cells.Item(row, 12).value().bStr();
        ledgerjournalTrans.Dimension[4]=Cells.Item(row, 2).value().bStr();
        ledgerjournalTrans.insert();
       // RCell = Cells.Item(row, 1);
        type = cells.item(row+1, 1).value().variantType();
         row++;

    }
    while (type != COMVariantType::VT_EMPTY);

    ttscommit;
    info("Customer payment lines imported Successfuly");
    info(strfmt("journal Number %1" , ledgerJournalTable.JournalNum));
    app.quit();

}

///

Static LedgerJournalTable createLedgerJournalTable(LedgerJournalNameID _ledgerJournalNameID)
{
     LedgerJournalName   ledgerJournalName;
      LedgerJournalTable ledgerJournaltable;
      NumberSeq           numberSeqLoc;
     ;
/*elect firstonly ledgerjournalName where ledgerJournalName.JournalName == 'ARPay';
    ledgerJournalTable.JournalName = LedgerJournalName.JournalName;
    ledgerJournalTable.initFromLedgerJournalName();
    ledgerJournalTable.insert();*/
   // numberSeqLoc = NumberSeq::newGetVoucherFromCode(ledgerJournalName.VoucherSeries);
return ledgerJournaltable;
}
///////////////////////////////////////////////////////////////////////////////////////////////////////////////////
static void Main(Args _args)
{
KR_CustPaymentImport krCustPaymentImport;
krCustPaymentImport = new KR_CustPaymentImport();
krCustPaymentImport.run();
}

Tuesday, 26 July 2016

Form Data displaying Asending Or Descending through code

// Changed on 26 Jul 2016 at 05:09:16 by jredd
public void init()
{
    super();
         this.query().dataSourceNo(1).addSortField(fieldnum(Kr_eDoc_CheckRegister,kr_ChequeNumber),SortOrder::Descending);

// this.query().dataSourceNo(1).addSortField(fieldnum(TableName, Fieldname),SortOrder::Descending);
}

Tuesday, 5 July 2016

Dynamics AX 7 Development - IDE (Part I)

Discuss Dynamics AX Scenarios and cases & Dynamics AX Tips

Microsoft Dynamics AX 2012 R3 Installation Step By Step

Microsoft Dynamics AX 2012 R3 Installation Step By Step

Please Follow the steps bellow:

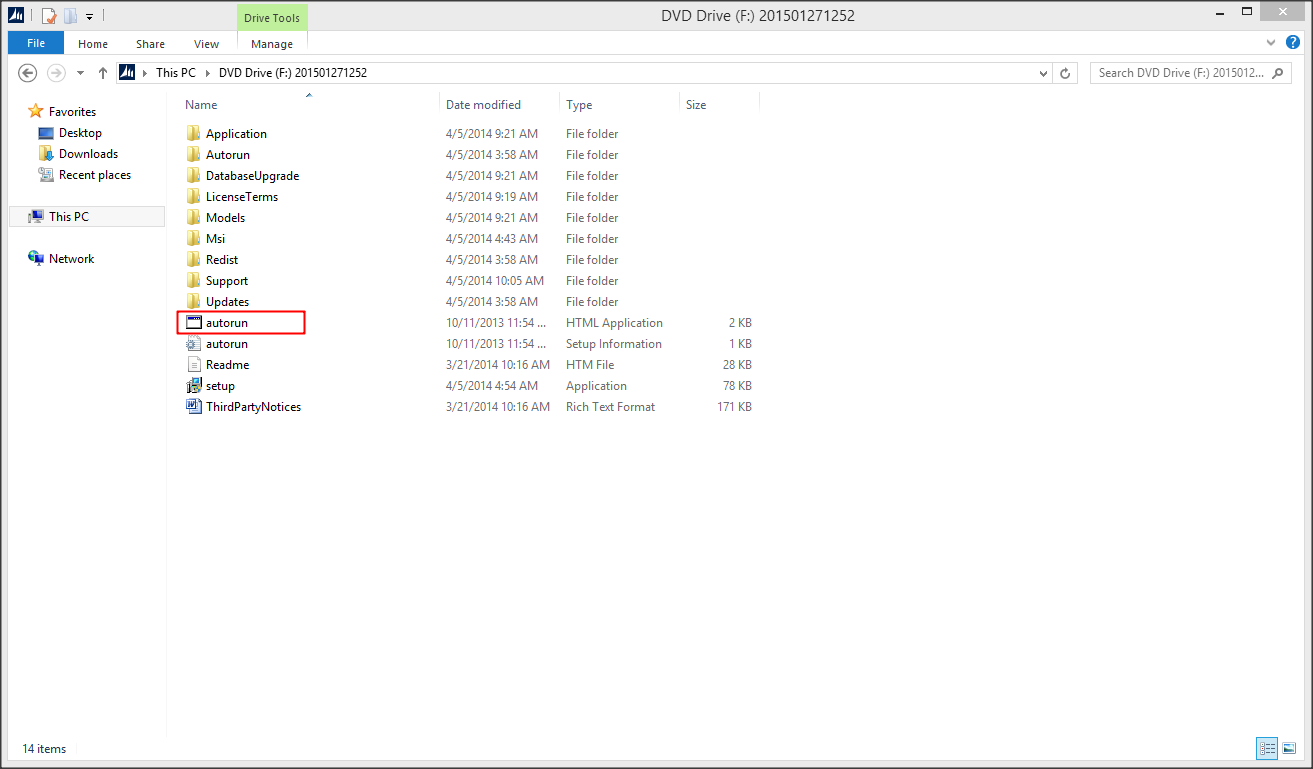
1- Open the Dynamics AX Media the double click the autorun.exe


2- when the Installer windows appear click the"Validate system requirements" to make sure that all prerequisites was installed.

3-Select the components that you attend to install. in our case we are going to select the Database, Application Object Server(AOS), and the client Component. then press the Validate Button.


4- Make sure that there is no errors then Click Finish. if any error appears you must fix it before continue.

5- Go back to the Installer main windows and click "Microsoft Dynamics AX Components".

6- Press next in the welcome screen.

7- In the license screen select "I Accept the license terms" then press Next Button.  

8- in the Customer Experience screen i am going to select "I Don't want to join the program at this time" then click next.

9- Select file location then click next.

10- Click Install.

11- Wait until the Dynamics AX setup support files has been installed.

12- In the installation screen Select "Microsoft Dynamics AX" then click next.

13- In the installation type screen Select "Custom Installation" then click next.

14- Now Select the Database Component alone. then click next.

15- in the Prerequisite validation screen make sure that everything is ok then click Next.

16- then Select Create New Databases option then click next.

17- in the database information you can change the databases names or you can accept the default values. when you finish click next.

18- in the select additional models make sure to check the foundation Model then click next.

19- The "Prerequisite validation screen" will popped again. make sure that everything is OK then click Next.

20- Click Install.

21- Click Finish.

22- Check the log to make sure that the database was installed successfully.

23- Now Repeat steps 5 and 6.
24- In the installation screen Select "Microsoft Dynamics AX" then click next.

25- In the installation type screen Select "Custom Installation" then click next.

26- Now Select the Application Object Server(AOS), Client Complainants then click next.

27- The "Prerequisite validation screen" will popped again. make sure that everything is OK then click Next.

28- Select file location then click next.

29- In the "Connect to the databases" Screen select the server name, The databases names then click Next.

30- Leave the port information as is. then click Next.


31- Specify the AOS Account. in our case we are going to select Domain Account then click next.

32- Warring of using the user account will appear. Click OK.

33- Select the Client preferences then Click Next.

34-The "Prerequisite validation screen" will popped again. make sure that everything is OK then click Next.

35-Click Install.

36-Wait Until the installation process completed. then click Finish Button.

37-Check the log to make sure that tall components was installed successfully.

38- Restart the windows then run AX.

39-Congratulation AX was installed successfully. In next article we are going to illustrate how to complete the initialization checklist. 


Install Dynamics AX 2012 R3 Step by Step (Step 2)


In the previous article we discussed how to install AX basic componentstoday we are going to discuss how to complete the initialization checklist and the partition initialization chick list.
Please follow the following steps:

 
1- Since we are not going to discuss the Lifecycle services and Customer feedback options in this post we will mark this option as complete. Click mark as complete for both the "Lifecycle services" and the "Customer feedback options".


2- Click the "Compile Application".


3- a warning message will papers to inform you that this step will take long time (in my laptop around 5 hours). click Yes Button.


4- Don't panic if the system looks like not responding. just wait.


5- When the compile is finished make sure there is No errors.


6- Next step is to compile into .NET framework CIL. Click the "compile into .NET framework CIL" Link.


7- a warning message will appears to inform you that this step will take long time(in my laptop a round 1 hours).click Yes


8- when the compile into .NET framework CIL is finished. info log will appears make sure everything is ok then click close button. 


9- Since we are going to use the demo license please click mark as complete for both the "Provide license information" and "configure application functionality" .


10- Then Click the Modify data types.


11- Click Ok button on the modify data types form.


12- Then click "synchronize database (required)" to synchronize the database.


13- Since we are not going to create partitions please click mark as complete.


14- Under the Configure accounts and profiles node. click Mark as complete for both the "Initialize user profiles" and "Setup Application Integration framework".


15- Click the Configure system accounts.


16- Enter the logon Alias and the network domain of the account to use for the business connector proxy. and for the synchronization service account. then press ok.


17- Move to the partition initialization checklist and click on the Configure partition accounts.


18- Enter the logon Alias and the network domain and click Ok.


19- Click "Create reference data".


20- Since we are not going to create a new legal entitles in this step please click Mark as complete.


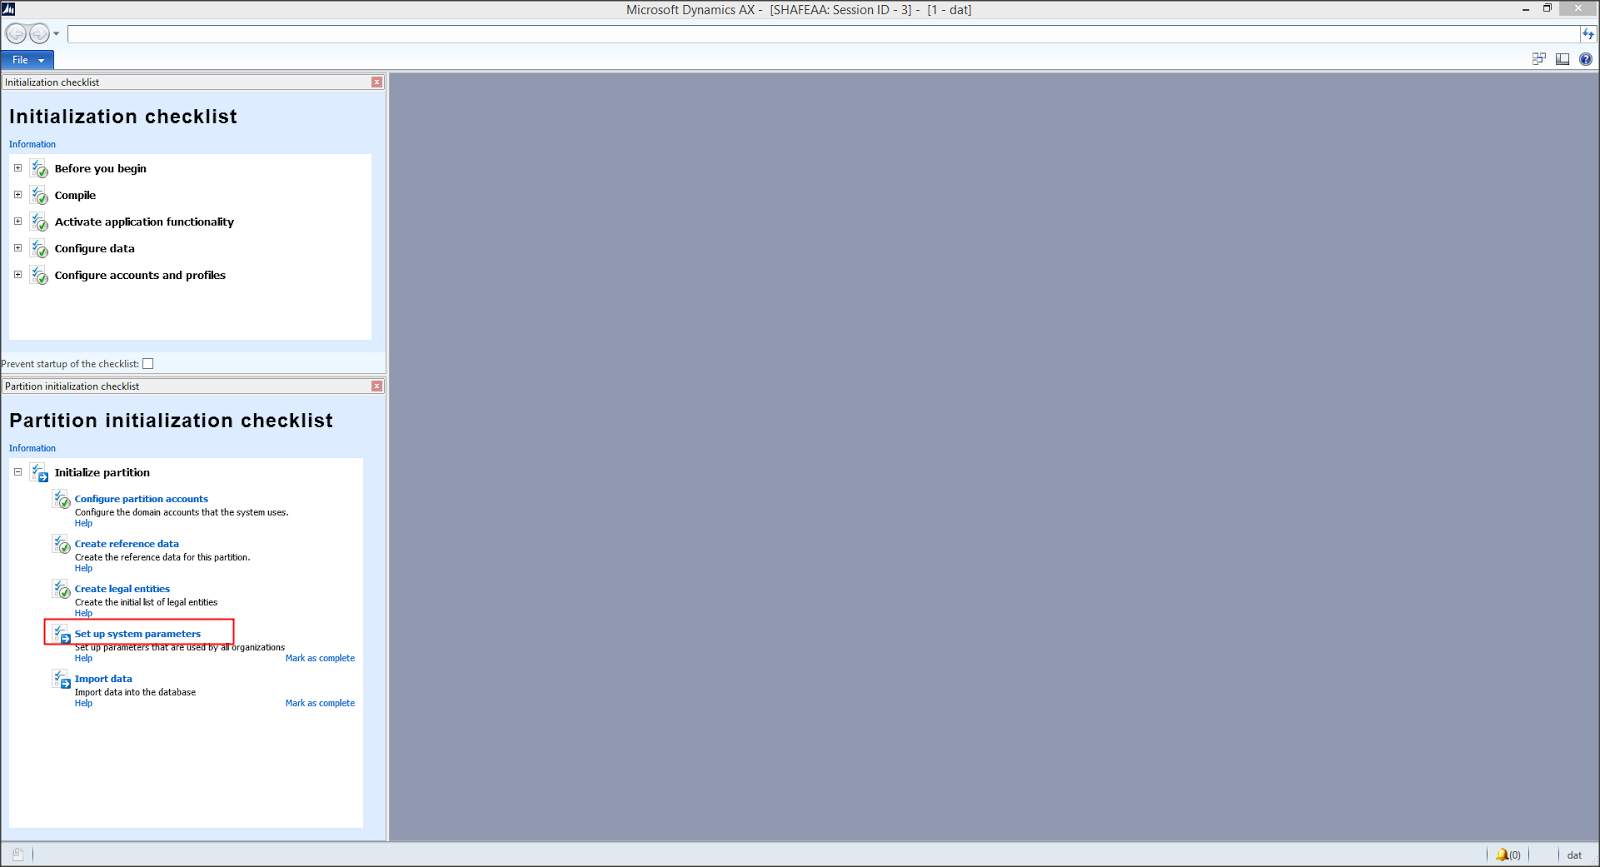
21- Click the "set up system parameters"


22- Select the system Language then click Close Button.


23- click close in the Infolog


24- since we are not going to import database data in this stage please click Mark as complete.


25- Close the system and reopen it.


26- Congratulation, we finished the installation check list. 


27- as you can see there is no demo company. in the next article we will discuss how to import Contoso demo data.


Install Dynamics AX 2012 R3 Step by Step (Step 3)


In the previous articles we discussed how to install AX basic components andinitialization checklist.  Today we are going to discuss how to import AX Demo Data. Before we can import the demo data we need to prepare the prerequisites. Two prerequisites are required. Download the demo data, and Test Data Transfer Tool.


Please follow the following steps

1- From the PartnerSource go to Microsoft Dynamics AX 2012 R3 page then Click Demo Material Link.

2- in the demo Material Table click the Contoso Demo Data.

3- from the Microsoft File Transfer Manager select the download path then click the Transfer button.

4- Go back to the Demo Material Table then from the description click the Test Data Transfer Tool (beta) to download the tool installer from the Downloadable tools section of Microsoft Dynamics Lifecycle Services.

5- Loging to the Microsoft Dynamics Lifecycle Services then click the Downloadable Tools.

6- Download the Microsoft Dynamics ax 2012 Test Data Transfer Tool.

7- Double Click the Contoso Demo Data file, then press accept button from the installer.

8- Select the path then click Install (Extract the demo data from the package to the database server that hosts the AX 2012 R3 business database for your environment).

9- after that we need to install Test Data Transfer Tool. Double Click the Test Data Transfer Tool installer file. when the installer start Click Next Button.

10- Select the Accept check box then click Next.

11- Select the path then click next. (Please remember this path you will need it latter).

12- Click Install button.

13- Click Finish button.

14- Go to Control Panel > Services, stop the AOS instance associated with your environment.

15- Using Windows Explorer, browse to the Test Data Transfer Tool (beta) folder.

16- On the File menu in Windows Explorer, click Open command prompt as administrator. 

17- Open the SQL Server Management studio, write down the instance name.

18- Backup MicrosoftDynamicsAX Database, in case anything goes wrong.

19- At the command prompt, enter the following command to import the demo data: dp.exe import [location of demo data] [Name of AX business database] [Servername\InstanceName]. in our case the command will look like this
dp.exe import e:\demodataMicrosoftDynamicsAXR3DemoData MicrosoftDynamicsAX SHAFEAA then press Enter.

20- Enter y or Y then press enter. Import process will Start (It may take over 30 minutes to import the demo data.)

21- when the import process finished go to Control Panel > Services, start the AOS instance associated with your environment.

22- Open Dynamics AX

Congratulation, the demo data have been imported.